# Linux使用指令
# 指定运行级别
0:关机
1:单用户【找回丢失密码】
2:多用户状态无网络服务
3:多用户状态有网络服务
4:系统未使用保留给用户
5:图形界面
6:系统重启
常用运行级别是3和5,要修改默认的运行级别可改文件/etc/inittab的id:5:initdefault:这一行中的数字

- centos7查看配置文件
# centos7查看配置文件:cat /etc/inittab ,如下:
# multi-user.target类似于runlevel 3;
# graphical.target类似于runlevel5

#查看默认运行级别的方式为
systemctl get-default

#设置默认运行级别的方式
systemctl set-default TARGET.target
2
3
4
5
6
7
8
9
- centos7运行级别对应表
| init级别 | systemctl target | 说明 |
|---|---|---|
| 0 | shutdown.target | 关机 |
| 1 | emergency.target | 单用户模式 |
| 2 | rescure.target | 多用户字符界面(不支持网络) |
| 3 | multi-user.target | 多用户字符界面 |
| 4 | 无 | 未定义 |
| 5 | graphical.target | 图形界面 |
| 6 | 无 | 重启 |
# 切换到指定运行级别的指令
# 基本语法
init [012356]
或者centos7命令格式:
systemctl [command] [unit.target]
command:
get-default :取得当前的target
set-default :设置指定的target为默认的运行级别
isolate :切换到指定的运行级别
unit.target :为'centos7运行级别对应表'中列出的运行级别
2
3
4
5
6
| systemctl | 命令 说明 |
|---|---|
| systemctl get-default | 获得当前的运行级别 |
| systemctl set-default multi-user.target | 设置默认的运行级别为mulit-user |
| systemctl isolate multi-user.target | 在不重启的情况下,切换到运行级别mulit-user下 |
| systemctl isolate graphical.target | 在不重启的情况下,切换到图形界面下 |
# 应用实例
案例1:通过init来切换不同的运行级别,比如5 —> 3,然后关机。 init 3 init 5 init 0
# 如何找回root密码
如果我们不小心,忘记了root密码,怎么找回?
思路:进入到单用户模式,然后修改root密码。因为进入单用户模式,root不需要密码就可以登录。
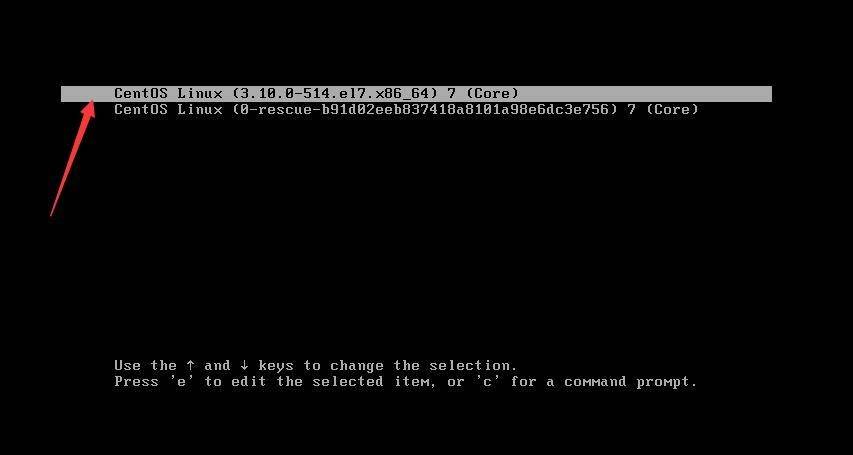
centos7进入单用户模式:
一、开机时进入如下界面,(按下方向键盘,阻止系统自动继续)
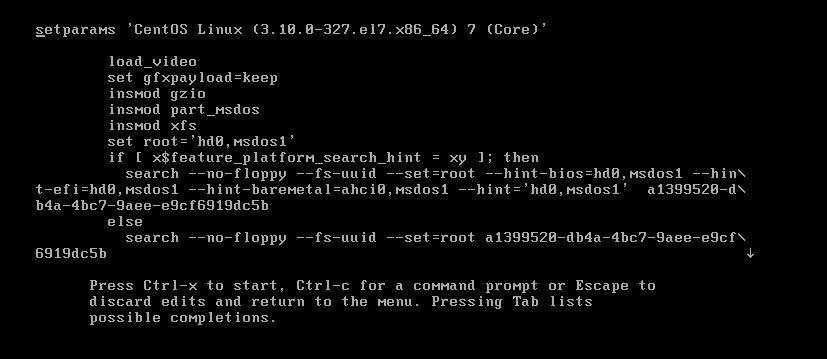
按e键出现下面界面
按方向键下,定位到最后,找到“ro”一行,ro的意思是read only,将“ro”替换成 rw init=/sysroot/bin/sh,如下图
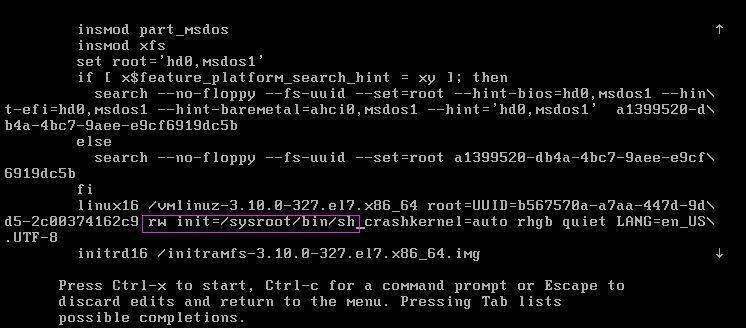
二、按Ctrl-x 进行重启进入单用户模式
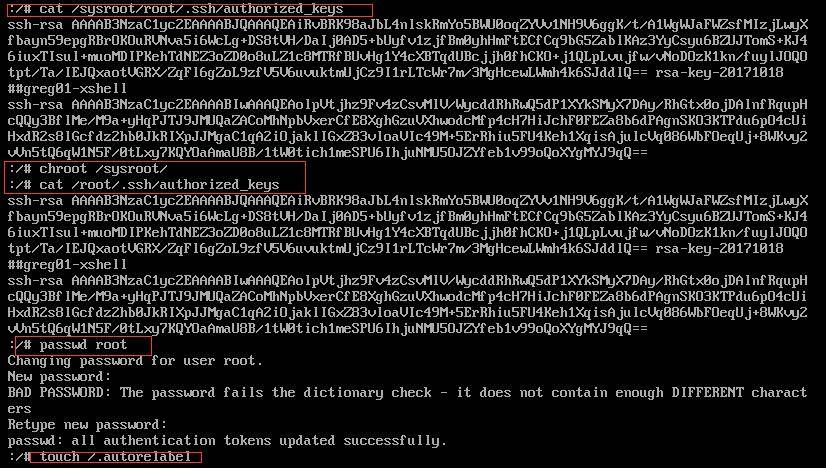
三、执行chroot /sysroot。其中chroot命令用来切换系统,/sysroot/目录就是原始系统
:/# chroot /sysroot
:/#
2
四、如果要修改root密码
passwd root是修改root密码的命令,touch /.autorelabel 执行这行命令作用是让SELinux生效,
如果不执行,密码不会生效。按Ctrl+D,执行reboot重启生效。如下图
五、如果因为启用x-window或者显卡驱动更新,无法进入桌面,可以修改默认启动级别(开机进入命令行模式)
systemctl set-default multi-user.target  #设置成命令模式
init 3 # 切换到字符模式,有时只使用上面的语句没有效果
按下Ctrl+D后,执行reboot
2
3
# 帮助指令
# 介绍
当我们对某个指令不熟悉时,我们可以使用Linux提供的帮助指令来了解这个指令的使用方法。
# man获取帮助指令
- 基本语法
man [命令或配置文件] (功能描述:获取帮助信息)
- 应用实例
案例:查看ls命令的帮助信息
man ls
# help获取帮助指令
- 基本语法
help 命令(功能描述:获取shell内置命令的帮助信息)
- 应用实例
案例:查看cd命令的帮助信息
help cd
# 文件目录类指令
# pwd指令
基本语法 pwd (功能描述:显示当前工作目录的绝对路径)
应用案例 案例:显示当前工作目录的绝对路径
[root@hadoop01 ~]# pwd
/root
2
# ls指令
基本语法 ls [选型] [目录或是文件]
常用选项 -a:显示当前目录所有文件和目录,包括隐藏的。 -l:以列表的方式显示信息。
应用案例 案例:查看当前目录所有内容信息
[root@hadoop01 ~]# ls -a
.   anaconda-ks.cfg  .bash_logout   .bashrc  hello.java  .viminfo
..  .bash_history    .bash_profile  .cshrc   .tcshrc
[root@hadoop01 ~]# ls -l
总用量 8
-rw-------. 1 root root 1493 1月   7 18:59 anaconda-ks.cfg
-rw-r--r--. 1 root root  104 1月   7 16:08 hello.java
2
3
4
5
6
7
# cd指令
基本语法 cd [参数] (功能描述:切换到指定目录)
常用参数
绝对路径和相对路径。
cd ~ 或者 cd :回到自己的家目录
cd .. 回到当前目录的上一级目录
应用案例 案例1:使用绝对路径切换到root目录
[root@hadoop01 ~]# cd /root
案例2:使用相对路径切换到root目录
[root@hadoop01 home]# pwd
/home
[root@hadoop01 home]# cd ../root/
[root@hadoop01 ~]# pwd
/root
2
3
4
5
案例3:回到当前目录的上一级目录
[root@hadoop01 ~]# cd ..
案例4:回倒家目录
[root@hadoop01 /]# cd
#或
[root@hadoop01 ~]# cd ~
2
3
# mkdir指令
mkdir指令用于创建目录(make directory)
基本语法 mkdir [选项] 要创建的目录
常用选项 -p:创建多级目录
应用案例 案例1:创建/home/animal/dog目录
[root@hadoop01 ~]# mkdir -p /home/animal/dog
[root@hadoop01 ~]# cd /home/animal/dog/
[root@hadoop01 dog]# pwd
/home/animal/dog
2
3
4
# rmdir指令
rmdir指令用于删除目录(remove directory)
基本语法 rmdir [选项] 要删除的目录
应用案例
案例1:删除一个目录/home/dog
rmdir /home/dog/
使用细节 rmdir删除的是空目录,如果目录下有内容时无法删除。
提示:如果需要删除非空目录,需要使用 rm -rf 要删除的目录。
[root@hadoop01 home]# rm -rf /home/animal/
# touch指令
touch指令用于创建空文件
基本语法 touch 文件名
应用案例 创建一个hello.txt文件
touch hello.txt
创建多个文件:a.txt和b.txt
[root@hadoop01 home]# touch a.txt b.txt
[root@hadoop01 home]# ls
a.txt  b.txt  hello.txt  kayson  test
2
3
# cp指令[重要]
cp指令用于拷贝文件到指定目录
基本语法
cp [选项] source dest
常用选项 -r:递归复制整个文件夹
应用案例
案例1:将/home/a.txt拷贝到/home/test下
[root@hadoop01 home]# ls
a.txt  b.txt  hello.txt  kayson  test
[root@hadoop01 home]# cp /home/a.txt /home/test/
[root@hadoop01 home]# cd /home/test/
[root@hadoop01 test]# ls
a.txt
2
3
4
5
6
案例2:将/home/aaa拷贝到/home/bbb下
[root@hadoop01 home]# ls
aaa  bbb  hello.txt  kayson  test
[root@hadoop01 home]# cd aaa
[root@hadoop01 aaa]# ls
a.txt  b.txt
[root@hadoop01 aaa]# cd ../bbb
[root@hadoop01 bbb]# ls
[root@hadoop01 bbb]# cd ..
[root@hadoop01 home]# cp -r aaa/ bbb
[root@hadoop01 home]# cd bbb/
[root@hadoop01 bbb]# ls
aaa
[root@hadoop01 bbb]# cd aaa/
[root@hadoop01 aaa]# pwd
/home/bbb/aaa
[root@hadoop01 aaa]# ls
a.txt  b.txt
2
3
4
5
6
7
8
9
10
11
12
13
14
15
16
17
使用细节 强制覆盖不提示的方法:\cp cp -r /test /aa 这个指令当发现目标目录下有相同文件,会提示你是否覆盖。
\cp -r /test /aa 这个指令会强制覆盖原来的文件,不会提示。
# rm指令
rm指令移除文件或目录
基本语法
rm [选项] 要删除的文件或目录
常用选项 -r:递归删除整个文件夹
-f:强制删除不提示
应用案例 案例1:将/home/hello.txt删除
[root@hadoop01 home]# ls
aaa  bbb  hello.txt  kayson  test
[root@hadoop01 home]# rm hello.txt
rm:是否删除普通空文件 "hello.txt"?y
[root@hadoop01 home]# ls
aaa  bbb  kayson  test
2
3
4
5
6
案例2:递归删除整个文件夹/home/aaa
[root@hadoop01 bbb]# rm -r aaa/
rm:是否进入目录"aaa/"? y
rm:是否删除普通空文件 "aaa/a.txt"?y
rm:是否删除普通空文件 "aaa/b.txt"?y
rm:是否删除目录 "aaa/"?y
2
3
4
5
使用细节
强制删除不提示的方法:带上-f参数即可
# mv指令
mv移动文件、目录或重命名
基本语法 mv oldNameFile newNameFile (功能描述:重命名) mv /temp/movefile /targetFolder (功能描述:文档文件)
应用案例 案例1:将/home/aaa.txt 文件 重命名为 bbb.txt
[root@hadoop01 home]# ls
aaa.txt  kayson  test
[root@hadoop01 home]# mv aaa.txt bbb.txt #重命名
[root@hadoop01 home]# ls
bbb.txt  kayson  test
2
3
4
5
案例2:将/home/bbb.txt 文件 移动到 /toot目录下
[root@hadoop01 home]# ls
bbb.txt  kayson  test
[root@hadoop01 home]# mv bbb.txt /root/ #移动文件
[root@hadoop01 home]# ls
kayson  test
[root@hadoop01 home]# cd /root
[root@hadoop01 ~]# ls
anaconda-ks.cfg  bbb.txt  hello.java  test.txt
2
3
4
5
6
7
8
# cat指令
cat 查看文件内容,是以只读的方式打开
基本语法
cat [选项] 要查看的文件
常用选项 -n:显示行号
应用案例 案例1:/etc/profile文件内容,并显示行号
点击查看代码
[root@hadoop01 ~]# cat -n /etc/profile
     1  # /etc/profile
     2
     3  # System wide environment and startup programs, for login setup
     4  # Functions and aliases go in /etc/bashrc
     5
     6  # It's NOT a good idea to change this file unless you know what you
     7  # are doing. It's much better to create a custom.sh shell script in
     8  # /etc/profile.d/ to make custom changes to your environment, as this
     9  # will prevent the need for merging in future updates.
    10
    11  pathmunge () {
    12      case ":${PATH}:" in
    13          *:"$1":*)
    14              ;;
    15          *)
    16              if [ "$2" = "after" ] ; then
    17                  PATH=$PATH:$1
    18              else
    19                  PATH=$1:$PATH
    20              fi
    21      esac
    22  }
    23
    24
    25  if [ -x /usr/bin/id ]; then
    26      if [ -z "$EUID" ]; then
    27          # ksh workaround
    28          EUID=`/usr/bin/id -u`
    29          UID=`/usr/bin/id -ru`
    30      fi
    31      USER="`/usr/bin/id -un`"
    32      LOGNAME=$USER
    33      MAIL="/var/spool/mail/$USER"
    34  fi
    35
    36  # Path manipulation
    37  if [ "$EUID" = "0" ]; then
    38      pathmunge /usr/sbin
    39      pathmunge /usr/local/sbin
    40  else
    41      pathmunge /usr/local/sbin after
    42      pathmunge /usr/sbin after
    43  fi
    44
    45  HOSTNAME=`/usr/bin/hostname 2>/dev/null`
    46  HISTSIZE=1000
    47  if [ "$HISTCONTROL" = "ignorespace" ] ; then
    48      export HISTCONTROL=ignoreboth
    49  else
    50      export HISTCONTROL=ignoredups
    51  fi
    52
    53  export PATH USER LOGNAME MAIL HOSTNAME HISTSIZE HISTCONTROL
    54
    55  # By default, we want umask to get set. This sets it for login shell
    56  # Current threshold for system reserved uid/gids is 200
    57  # You could check uidgid reservation validity in
    58  # /usr/share/doc/setup-*/uidgid file
    59  if [ $UID -gt 199 ] && [ "`/usr/bin/id -gn`" = "`/usr/bin/id -un`" ]; then
    60      umask 002
    61  else
    62      umask 022
    63  fi
    64
    65  for i in /etc/profile.d/*.sh /etc/profile.d/sh.local ; do
    66      if [ -r "$i" ]; then
    67          if [ "${-#*i}" != "$-" ]; then
    68              . "$i"
    69          else
    70              . "$i" >/dev/null
    71          fi
    72      fi
    73  done
    74
    75  unset i
    76  unset -f pathmunge
2
3
4
5
6
7
8
9
10
11
12
13
14
15
16
17
18
19
20
21
22
23
24
25
26
27
28
29
30
31
32
33
34
35
36
37
38
39
40
41
42
43
44
45
46
47
48
49
50
51
52
53
54
55
56
57
58
59
60
61
62
63
64
65
66
67
68
69
70
71
72
73
74
75
76
77
使用细节
cat只能浏览文件,不能修改文件,为了浏览方便,一般会带上 管道命令 | more,并按 空格键 分页。
# more指令
more 指令是一个基于vi编辑器的文本过滤器,他以全屏幕的方式按页显示文本的内容。
more 指令中内置了若干快捷键,详见如下:
基本语法 more 要查看的文件
操作说明
| 操作 | 功能说明 |
|---|---|
| 空白键(space) | 代表向下翻一页 |
| Enter | 代表下翻一行 |
| q | 代表立刻离开more,不再显示该文件的内容 |
| Ctrl+F | 向下滚动一屏 |
| Ctrl+B | 返回上一屏 |
| = | 输出当前行的行号 |
| :f | 输出文件名和当前行的行号 |
应用案例 案例1:采用more 查看/etc/profile文件
more /etc/profile
# less指令
less 指令用来分屏查看文件内容,它的功能与more指令类似,但是比more指令更加强大,支持各种显示终端。
less 指令在显示文件内容时,并不是一次将整个文件加载之后才显示,而是根据显示需要加载的内容,对于显示大型文件具有较高的效率。
基本语法 less 要查看的文件
操作说明
| 操作 | 功能说明 |
|---|---|
| 空白键(space) | 向下翻一页 |
| pagedown | 向下翻一页 |
| pageup | 向上翻一页 |
| /字符串 | 向下搜寻[字符串]的功能,n:向下查找,N:向上查找 |
| ?字符串 | 向上搜寻[字符串]的功能,n:向上查找,N:向下查找 |
| q | 离开less整个程序 |
应用案例
案例:采用less查看一个大文件/opt/小说.txt
less /opt/小说.txt
# >指令和 >>指令
介绍
> :输出重定向,会将原来的文件内容覆盖
>> :追加,不会覆盖原来文件的内容,而是追加到文件的末尾
基本语法
1)ls -l > 文件 功能描述:列表的内容写入文件中(覆盖写)
#将ls -l > a.txt,将ls -l的显示内容覆盖写入到a.txt文件,如果该文件不存在,就创建该文件
[root@hadoop01 ~]# ls -l > a.txt
[root@hadoop01 ~]# ls
anaconda-ks.cfg  a.txt  bbb.txt  hello.java  test.txt
[root@hadoop01 ~]# cat a.txt
总用量 16
-rw-------. 1 root root 1493 1月   7 18:59 anaconda-ks.cfg
-rw-r--r--. 1 root root    0 1月   8 23:06 a.txt
-rw-r--r--. 1 root root   22 1月   8 22:01 bbb.txt
-rw-r--r--. 1 root root  104 1月   7 16:08 hello.java
-rw-r--r--. 1 root root  363 1月   8 11:41 test.txt
2
3
4
5
6
7
8
9
10
11
2)ls -al >> 文件 功能描述:列表的内容追加到文件的末尾
#ls -al >> b.txt,将ls -al显示的内容追加到b.txt文件中
[root@hadoop01 ~]# ls -al >> b.txt
[root@hadoop01 ~]# ls
anaconda-ks.cfg  a.txt  bbb.txt  b.txt  hello.java  test.txt
[root@hadoop01 ~]# more b.txt
总用量 56
dr-xr-x---.  2 root root  242 1月   8 23:09 .
dr-xr-xr-x. 17 root root  245 1月   7 21:13 ..
-rw-------.  1 root root 1493 1月   7 18:59 anaconda-ks.cfg
-rw-r--r--.  1 root root  283 1月   8 23:06 a.txt
-rw-------.  1 root root 3123 1月   8 22:40 .bash_history
-rw-r--r--.  1 root root   18 12月 29 2013 .bash_logout
-rw-r--r--.  1 root root  176 12月 29 2013 .bash_profile
-rw-r--r--.  1 root root  176 12月 29 2013 .bashrc
-rw-r--r--.  1 root root   22 1月   8 22:01 bbb.txt
-rw-r--r--.  1 root root    0 1月   8 23:09 b.txt
-rw-r--r--.  1 root root  100 12月 29 2013 .cshrc
-rw-r--r--.  1 root root  104 1月   7 16:08 hello.java
-rw-------.  1 root root   73 1月   8 23:06 .lesshst
-rw-r--r--.  1 root root  129 12月 29 2013 .tcshrc
-rw-r--r--.  1 root root  363 1月   8 11:41 test.txt
-rw-------.  1 root root 6117 1月   8 22:38 .viminfo
2
3
4
5
6
7
8
9
10
11
12
13
14
15
16
17
18
19
20
21
22
3)cat 文件1 > 文件2 功能描述:将文件1的内容覆盖到文件2
[root@hadoop01 ~]# more a.txt
总用量 16
-rw-------. 1 root root 1493 1月   7 18:59 anaconda-ks.cfg
-rw-r--r--. 1 root root    0 1月   8 23:06 a.txt
-rw-r--r--. 1 root root   22 1月   8 22:01 bbb.txt
-rw-r--r--. 1 root root  104 1月   7 16:08 hello.java
-rw-r--r--. 1 root root  363 1月   8 11:41 test.txt
[root@hadoop01 ~]# more b.txt
总用量 56
dr-xr-x---.  2 root root  242 1月   8 23:09 .
dr-xr-xr-x. 17 root root  245 1月   7 21:13 ..
-rw-------.  1 root root 1493 1月   7 18:59 anaconda-ks.cfg
-rw-r--r--.  1 root root  283 1月   8 23:06 a.txt
-rw-------.  1 root root 3123 1月   8 22:40 .bash_history
-rw-r--r--.  1 root root   18 12月 29 2013 .bash_logout
-rw-r--r--.  1 root root  176 12月 29 2013 .bash_profile
-rw-r--r--.  1 root root  176 12月 29 2013 .bashrc
-rw-r--r--.  1 root root   22 1月   8 22:01 bbb.txt
-rw-r--r--.  1 root root    0 1月   8 23:09 b.txt
-rw-r--r--.  1 root root  100 12月 29 2013 .cshrc
-rw-r--r--.  1 root root  104 1月   7 16:08 hello.java
-rw-------.  1 root root   73 1月   8 23:06 .lesshst
-rw-r--r--.  1 root root  129 12月 29 2013 .tcshrc
-rw-r--r--.  1 root root  363 1月   8 11:41 test.txt
-rw-------.  1 root root 6117 1月   8 22:38 .viminfo
[root@hadoop01 ~]# cat a.txt > b.txt
[root@hadoop01 ~]# more b.txt
总用量 16
-rw-------. 1 root root 1493 1月   7 18:59 anaconda-ks.cfg
-rw-r--r--. 1 root root    0 1月   8 23:06 a.txt
-rw-r--r--. 1 root root   22 1月   8 22:01 bbb.txt
-rw-r--r--. 1 root root  104 1月   7 16:08 hello.java
-rw-r--r--. 1 root root  363 1月   8 11:41 test.txt
[root@hadoop01 ~]#
2
3
4
5
6
7
8
9
10
11
12
13
14
15
16
17
18
19
20
21
22
23
24
25
26
27
28
29
30
31
32
33
34
4)echo "内容" >> 文件 功能描述:将内容写入到文件中
# 1.追加内容
[root@hadoop01 ~]# more b.txt
总用量 16
-rw-------. 1 root root 1493 1月   7 18:59 anaconda-ks.cfg
-rw-r--r--. 1 root root    0 1月   8 23:06 a.txt
-rw-r--r--. 1 root root   22 1月   8 22:01 bbb.txt
-rw-r--r--. 1 root root  104 1月   7 16:08 hello.java
-rw-r--r--. 1 root root  363 1月   8 11:41 test.txt
[root@hadoop01 ~]# echo "hello world" >> b.txt #追加内容
[root@hadoop01 ~]# more b.txt
总用量 16
-rw-------. 1 root root 1493 1月   7 18:59 anaconda-ks.cfg
-rw-r--r--. 1 root root    0 1月   8 23:06 a.txt
-rw-r--r--. 1 root root   22 1月   8 22:01 bbb.txt
-rw-r--r--. 1 root root  104 1月   7 16:08 hello.java
-rw-r--r--. 1 root root  363 1月   8 11:41 test.txt
hello world
# 2.覆盖内容
[root@hadoop01 ~]# more b.txt
总用量 16
-rw-------. 1 root root 1493 1月   7 18:59 anaconda-ks.cfg
-rw-r--r--. 1 root root    0 1月   8 23:06 a.txt
-rw-r--r--. 1 root root   22 1月   8 22:01 bbb.txt
-rw-r--r--. 1 root root  104 1月   7 16:08 hello.java
-rw-r--r--. 1 root root  363 1月   8 11:41 test.txt
hello world
[root@hadoop01 ~]# echo "你好" > b.txt #覆盖内容
[root@hadoop01 ~]# more b.txt
你好
2
3
4
5
6
7
8
9
10
11
12
13
14
15
16
17
18
19
20
21
22
23
24
25
26
27
28
29
应用实例
案例1:将/home目录下的文件列表 写入到/home/info.txt中
[root@hadoop01 ~]# ls -l /home/ > /home/info.txt
[root@hadoop01 ~]# more /home/info.txt
总用量 0
-rw-r--r--. 1 root   root  0 1月   8 23:20 info.txt
drwx------. 2 kayson haou 62 1月   7 17:37 kayson
drwx------. 2 test   test 55 1月   8 21:54 test
[root@hadoop01 ~]#
2
3
4
5
6
7
案例2:将当前日历信息追加到/home/mycal文件中(日历用cal)
[root@hadoop01 ~]# cal
      一月 2021
日 一 二 三 四 五 六
                1  2
 3  4  5  6  7  8  9
10 11 12 13 14 15 16
17 18 19 20 21 22 23
24 25 26 27 28 29 30
31
[root@hadoop01 ~]# cal >> /home/mycal
[root@hadoop01 ~]# more /home/mycal
      一月 2021
日 一 二 三 四 五 六
                1  2
 3  4  5  6  7  8  9
10 11 12 13 14 15 16
17 18 19 20 21 22 23
24 25 26 27 28 29 30
31
[root@hadoop01 ~]#
2
3
4
5
6
7
8
9
10
11
12
13
14
15
16
17
18
19
20
# echo 指令
介绍
echo 输出内容到控制台
基本语法
echo [选项] [输出内容]
应用实例
案例1:使用echo指令输出环境变量
[root@hadoop01 ~]# echo $PATH
/usr/local/sbin:/usr/local/bin:/usr/sbin:/usr/bin:/root/bin
2
案例2:使用echo指令输出hello,world
[root@hadoop01 ~]# echo "hello, world"
hello, world
2
# head指令
介绍
head 用于显示文件的开头部分内容,默认情况下head指令显示文件的前10行内容
基本语法
head 文件              功能描述:查看文件头10行
head -n 5 文件         功能描述:查看文件头5行内容,5可以是任意数
2
应用实例
案例:查看/etc/profile的前面5行代码
[root@hadoop01 ~]# head -n 5 /etc/profile
# /etc/profile

# System wide environment and startup programs, for login setup
# Functions and aliases go in /etc/bashrc
2
3
4
5
# tail指令
介绍
tail 用于输出文件中尾部的内容,默认情况下tail指令显示文件的后10行内容。
基本语法
tail 文件              功能描述:查看文件后10行内容
tail -n 5 文件         功能描述:查看文件后5行内容,5可以是任意数
tail -f 文件           功能描述:实时追踪该文档的所有更新,工作中经常使用
2
3
应用实例
案例1:查看/etc/profile的后5行代码
[root@hadoop01 ~]# tail -n 5 /etc/profile
    fi
done

unset i
unset -f pathmunge
2
3
4
5
6
案例2:实时监控mydate.txt,实时追加日期,查看文件的变化
# 实时监控mydate.txt文件,如果有变化则会看到变化
[root@hadoop01 home]# tail -f mydate.txt
2021年 01月 09日 星期六 16:18:51 CST
Sat Jan  9 16:19:44 CST 2021
Sat Jan  9 16:19:48 CST 2021
Sat Jan  9 16:19:53 CST 2021
Sat Jan  9 16:19:54 CST 2021
Sat Jan  9 16:19:55 CST 2021
Sat Jan  9 16:19:56 CST 2021
total 12
-rw-r--r--. 1 root   root 165 Jan  8 23:20 info.txt
drwx------. 2 kayson haou  62 Jan  7 17:37 kayson
-rw-r--r--. 1 root   root 159 Jan  8 23:21 mycal
-rw-r--r--. 1 root   root 217 Jan  9 16:19 mydate.txt
drwx------. 2 test   test  55 Jan  8 21:54 test
2
3
4
5
6
7
8
9
10
11
12
13
14
15
# ln指令
介绍
ln 软链接也叫符号链接。类似于windows里的快捷键方式,主要存放了链路其他文件的路径。
基本语法
ln -s [原文件或目录] [软链接名] 功能描述:给原文件创建一个软链接
应用实例
案例1:在/home目录下创建一个软链接linkToRoot,连接到/root目录
[root@hadoop01 home]# ln -s /root linkToRoot
[root@hadoop01 home]# ls -l
总用量 12
-rw-r--r--. 1 root   root 165 1月   8 23:20 info.txt
drwx------. 2 kayson haou  62 1月   7 17:37 kayson
lrwxrwxrwx. 1 root   root   5 1月   9 16:33 linkToRoot -> /root
-rw-r--r--. 1 root   root 159 1月   8 23:21 mycal
-rw-r--r--. 1 root   root 479 1月   9 16:20 mydate.txt
drwx------. 2 test   test  55 1月   8 21:54 test
[root@hadoop01 home]# cd linkToRoot/
[root@hadoop01 linkToRoot]# ls
anaconda-ks.cfg  a.txt  bbb.txt  b.txt  hello.java  test.txt
[root@hadoop01 linkToRoot]# pwd #当我们使用pwd指令查看目录时,仍然看到的是软链接所在的目录
/home/linkToRoot
2
3
4
5
6
7
8
9
10
11
12
13
14
案例2:删除软链接linkRoot
[root@hadoop01 home]# ls
info.txt  kayson  linkToRoot  mycal  mydate.txt  test
[root@hadoop01 home]# rm -rf linkToRoot/ #在删除软链接时不能带'/',否则无法删除
[root@hadoop01 home]# ls
info.txt  kayson  linkToRoot  mycal  mydate.txt  test
[root@hadoop01 home]# rm -rf linkToRoot
[root@hadoop01 home]# ls
info.txt  kayson  mycal  mydate.txt  test
[root@hadoop01 home]#
2
3
4
5
6
7
8
9
细节说明
当我们使用pwd指令查看目录时,仍然看到的是软链接所在的目录。
# history指令
介绍
history 查看已经执行过历史命令,也可以执行历史指令。
基本语法
history 功能描述:查看已经执行过历史命令
应用实例
案例1:显示所有的历史命令
[root@hadoop01 home]# history
案例2:显示最近使用过的10条指令
[root@hadoop01 home]# history 10
  493  cd /home/
  494  clear
  495  ls
  496  rm -rf linkToRoot/
  497  ls
  498  rm -rf linkToRoot
  499  ls
  500  clear
  501  history
  502  history 10
2
3
4
5
6
7
8
9
10
11
案例3:执行历史编号为495的指令
[root@hadoop01 home]# !495
ls
info.txt  kayson  mycal  mydate.txt  test
2
3
# 时间日期类指令
# date指令
# 当前日期
介绍
date 显示当前日期。
基本语法
1)date                       功能描述:显示当前时间
2)date +%Y                   功能描述:显示当前年份
3)date +%m                   功能描述:显示当前月份
4)date +%d                   功能描述:显示当前是哪一天
5)date "+%Y-%m-%d %H:%M:%S"  功能描述:显示年月日时分秒
2
3
4
5
应用实例
案例1:显示当前时间信息
[root@hadoop01 ~]# date
2021年 01月 09日 星期六 16:53:51 CST
2
案例2:显示当前年月日
[root@hadoop01 ~]# date "+%Y-%m-%d"
2021-01-09
2
案例3:显示当前年月日时分秒
[root@hadoop01 ~]# date "+%Y年%m月%d日 %H:%M:%S"
2021年01月09日 16:57:31
2
# 设置日期
基本语法
date -s 字符串时间
应用实例
案例1:设置系统当前时间,比如设置成2020-02-02 02:02:02
[root@hadoop01 ~]# date -s "2020-02-02 02:02:02"
2020年 02月 02日 星期日 02:02:02 CST
[root@hadoop01 ~]# date
2020年 02月 02日 星期日 02:02:04 CST
2
3
4
案例2:同步最新时间
#1.如果你的linux系统根本没有ntpdate这个命令, 可先安装
[root@hadoop01 ~]# yum install ntp
#2.安装完了之后,执行以下命令
[root@hadoop01 ~]# ntpdate time.nist.gov
 9 Jan 17:06:37 ntpdate[1684]: step time server 128.138.140.44 offset 29602948.249319 sec
[root@hadoop01 ~]# date
2021年 01月 09日 星期六 17:07:16 CST
[root@hadoop01 ~]#
2
3
4
5
6
7
8
# cal指令
查看日历指令 (calendar)。
基本语法
cal [选项] 功能描述:不加选项,显示本月日历
应用实例
案例1:显示当前日历
[root@hadoop01 ~]# cal
      一月 2021
日 一 二 三 四 五 六
                1  2
 3  4  5  6  7  8  9
10 11 12 13 14 15 16
17 18 19 20 21 22 23
24 25 26 27 28 29 30
31
2
3
4
5
6
7
8
9
案例2:显示2021年日历
点击查看代码
[root@hadoop01 ~]# cal 2021
                               2021

        一月                   二月                   三月
日 一 二 三 四 五 六   日 一 二 三 四 五 六   日 一 二 三 四 五 六
                1  2       1  2  3  4  5  6       1  2  3  4  5  6
 3  4  5  6  7  8  9    7  8  9 10 11 12 13    7  8  9 10 11 12 13
10 11 12 13 14 15 16   14 15 16 17 18 19 20   14 15 16 17 18 19 20
17 18 19 20 21 22 23   21 22 23 24 25 26 27   21 22 23 24 25 26 27
24 25 26 27 28 29 30   28                     28 29 30 31
31
        四月                   五月                   六月
日 一 二 三 四 五 六   日 一 二 三 四 五 六   日 一 二 三 四 五 六
             1  2  3                      1          1  2  3  4  5
 4  5  6  7  8  9 10    2  3  4  5  6  7  8    6  7  8  9 10 11 12
11 12 13 14 15 16 17    9 10 11 12 13 14 15   13 14 15 16 17 18 19
18 19 20 21 22 23 24   16 17 18 19 20 21 22   20 21 22 23 24 25 26
25 26 27 28 29 30      23 24 25 26 27 28 29   27 28 29 30
                       30 31
        七月                   八月                   九月
日 一 二 三 四 五 六   日 一 二 三 四 五 六   日 一 二 三 四 五 六
             1  2  3    1  2  3  4  5  6  7             1  2  3  4
 4  5  6  7  8  9 10    8  9 10 11 12 13 14    5  6  7  8  9 10 11
11 12 13 14 15 16 17   15 16 17 18 19 20 21   12 13 14 15 16 17 18
18 19 20 21 22 23 24   22 23 24 25 26 27 28   19 20 21 22 23 24 25
25 26 27 28 29 30 31   29 30 31               26 27 28 29 30

        十月                  十一月                 十二月
日 一 二 三 四 五 六   日 一 二 三 四 五 六   日 一 二 三 四 五 六
                1  2       1  2  3  4  5  6             1  2  3  4
 3  4  5  6  7  8  9    7  8  9 10 11 12 13    5  6  7  8  9 10 11
10 11 12 13 14 15 16   14 15 16 17 18 19 20   12 13 14 15 16 17 18
17 18 19 20 21 22 23   21 22 23 24 25 26 27   19 20 21 22 23 24 25
24 25 26 27 28 29 30   28 29 30               26 27 28 29 30 31
31
2
3
4
5
6
7
8
9
10
11
12
13
14
15
16
17
18
19
20
21
22
23
24
25
26
27
28
29
30
31
32
33
34
35
# 搜索查找类指令
# find指令
find指令将从指令目录向下递归地遍历及其各个子目录,将满足条件的文件或目录显示在终端。
基本语法
find [搜索范围] [选项] 功能描述:不加选项,显示本月日历
选项说明:
| 选项 | 功能 |
|---|---|
| -name<查询方式> | 按照指定的文件名查找模式查找文件 |
| -user<用户名> | 查找属于指定用户名所有文件 |
| -size<文件大小> | 按照指定的文件大小查找文件 |
应用实例
案例1:按文件名,根据名称查找/home目录下的hello.txt文件
# /home/:搜索范围,-name:按照名字 hello.txt:要查找的文件
[root@hadoop01 ~]# find /home/ -name hello.txt
/home/hello.txt

# 按通配符查找
[root@hadoop01 ~]# find /home/ -name *.txt
2
3
4
5
6
案例2:安拥有者,查找/opt目录下,用户名称为nobody的文件
[root@hadoop01 ~]# find /opt -u nobody
find: 未知的断言“-u”
2
案例3:查找整个linux系统下大于20M的文件(+n 大于,-n小于,n等于)
点击查看代码
# 查找大于20M的文件
[root@hadoop01 ~]# find / -size +20M
/boot/initramfs-0-rescue-904a7be243a049f28df8fb32c30cc385.img
/boot/initramfs-3.10.0-1160.el7.x86_64.img
/proc/kcore
find: ‘/proc/1794/task/1794/fd/6’: 没有那个文件或目录
find: ‘/proc/1794/task/1794/fdinfo/6’: 没有那个文件或目录
find: ‘/proc/1794/fd/5’: 没有那个文件或目录
find: ‘/proc/1794/fdinfo/5’: 没有那个文件或目录
/sys/devices/pci0000:00/0000:00:0f.0/resource1_wc
/sys/devices/pci0000:00/0000:00:0f.0/resource1
/var/lib/rpm/Packages
/var/cache/yum/x86_64/7/base/gen/primary_db.sqlite
/var/cache/yum/x86_64/7/updates/gen/primary_db.sqlite
/usr/lib/locale/locale-archive

# 查找小于10k的文件
[root@hadoop01 ~]# find / -size -10k

# 查找等于38k的文件
[root@hadoop01 ~]# find / -size 38k
2
3
4
5
6
7
8
9
10
11
12
13
14
15
16
17
18
19
20
21
# locate指令
locate指令可以快速定位文件路径。locate指令利用事先建立的系统中所有文件名称及路径的locate数据库实现快速定位给定的文件。locate指令无需遍历整个文件系统,查询速度较快。为了保证查询结果的准确度,管理员必定期更新locate时刻。
基本语法
locate 搜索文件
特别说明
由于locate指令基于数据库进行查询,所以第一次运行前,必须使用updatedb指令创建locate数据库。在linux中locate查找命名依赖updatedb的协助,updatedb命令需要使用mlocate包。如不存在updatedb用yum命令安装下mlocate包即可:yum -y install mlocate
应用实例
案例1:请使用locate指令快速定位hello.txt文件所在目录
[root@hadoop01 ~]# updatedb #创建locate数据库
[root@hadoop01 ~]# locate hello.txt
/home/hello.txt
2
3
# grep指令和管道符号|
grep 过滤查找,管道符"|",表示将前一个命令的处理结果输出传递给后面的命令处理。
基本语法
grep [选项] 查找内容 源文件
常用选项:
| 选项 | 功能 |
|---|---|
| -n | 显示匹配行及行号 |
| -i | 忽略字母大小写 |
应用实例
案例1:请在hello.txt文件中,查找“yes”所在行,并且显示行号
# 区分大小写
[root@hadoop01 home]# cat hello.txt | grep -n yes
4:yes
10:yes

# 不区分大小写
[root@hadoop01 home]# cat hello.txt | grep -ni yes
4:yes
10:yes
15:YES
2
3
4
5
6
7
8
9
10
# 压缩和解压类指令
# gzip/gunzip指令
gzip 用于压缩.gz文件,gunzip 用于解压.gz文件。
基本语法
gzip 文件     功能描述:压缩文件,只能将文件压缩压缩为*.gz文件
gunzip 文件   功能描述:解压文件命令
2
应用实例
案例1:gzip压缩,将/home下的hello.txt文件进行压缩
[root@hadoop01 home]# ls
hello.txt  info.txt  kayson  mycal  mydate.txt  test
[root@hadoop01 home]# gzip hello.txt
[root@hadoop01 home]# ls
hello.txt.gz  info.txt  kayson  mycal  mydate.txt  test
2
3
4
5
案例2:gunzip解压缩,将/home下的hello.txt.gz文件进行解压缩
[root@hadoop01 home]# gunzip hello.txt.gz
[root@hadoop01 home]# ls
hello.txt  info.txt  kayson  mycal  mydate.txt  test
2
3
细节说明
使用gzip对文件进行压缩后,不会保留原文件。
# zip/unzip指令
zip 用于压缩.zip文件,unzip 用于解压.zip文件。
安装zip/unzip
yum -y install zip
yum -y install unzip
2
基本语法
zip   [选项] xxx.zip 要压缩的内容    功能描述:压缩文件和目录的命令
unzip [选项] xxx.zip               功能描述:解压缩文件

zip常用选项
-r: 递归压缩,即压缩目录
unzip的常用选项
-d<目录>:指定解压后文件的存放目录
2
3
4
5
6
7
应用实例
案例1:将/home下所有文件压缩成mypackage.zip
# mypackage.zip:压缩后的文件  /home/*:要压缩的的内容
[root@hadoop01 home]# zip -r mypackage.zip /home/*
  adding: home/hello.txt (deflated 28%)
  adding: home/info.txt (deflated 31%)
  adding: home/kayson/ (stored 0%)
  adding: home/kayson/.bash_logout (stored 0%)
  adding: home/kayson/.bash_profile (deflated 21%)
  adding: home/kayson/.bashrc (deflated 23%)
  adding: home/mycal (deflated 31%)
  adding: home/mydate.txt (deflated 56%)
  adding: home/test/ (stored 0%)
  adding: home/test/.bashrc (deflated 23%)
  adding: home/test/.bash_history (deflated 52%)
  adding: home/test/a.txt (stored 0%)
[root@hadoop01 home]# ls
hello.txt  info.txt  kayson  mycal  mydate.txt  mypackage.zip  test
2
3
4
5
6
7
8
9
10
11
12
13
14
15
16
案例2:将/home/mypackage.zip解压到/opt/tmp目录下
# /opt/tmp:目标目录, mypackage.zip:要解压缩的文件
[root@hadoop01 home]# unzip -d /opt/tmp mypackage.zip
Archive:  mypackage.zip
  inflating: /opt/tmp/home/hello.txt
  inflating: /opt/tmp/home/info.txt
   creating: /opt/tmp/home/kayson/
 extracting: /opt/tmp/home/kayson/.bash_logout
  inflating: /opt/tmp/home/kayson/.bash_profile
  inflating: /opt/tmp/home/kayson/.bashrc
  inflating: /opt/tmp/home/mycal
  inflating: /opt/tmp/home/mydate.txt
   creating: /opt/tmp/home/test/
  inflating: /opt/tmp/home/test/.bashrc
  inflating: /opt/tmp/home/test/.bash_history
 extracting: /opt/tmp/home/test/a.txt
[root@hadoop01 home]# cd /opt/
[root@hadoop01 opt]# ls
tmp  小说.txt
2
3
4
5
6
7
8
9
10
11
12
13
14
15
16
17
18
# tar指令
tar 打包指令,最后打包后的文件是.tar.gz的文件。
安装zip/unzip
基本语法
tar [选项] xxx.tar.gz 打包的内容    功能描述:打包目录

选项说明
-c:产生.tar打包文件
-v:显示详细信息
-f:指定压缩后的文件名
-z:打包同时压缩
-x:解包.tar文件
2
3
4
5
6
7
8
应用实例
案例1:压缩多个文件,将/home/a1.txt和/home/a2.txt压缩成a.tar.gz
[root@hadoop01 home]# ls
a1.txt  hello.txt  kayson  mydate.txt     test
a2.txt  info.txt   mycal   mypackage.zip
# 将a1.txt、a2.txt压缩到a.tar.gz
# a.tar.gz:打包后的文件名,a1.txt a2.txt:这这些文件进行打包
[root@hadoop01 home]# tar -zcvf a.tar.gz a1.txt a2.txt
a1.txt
a2.txt
[root@hadoop01 home]# ls
a1.txt  a.tar.gz   info.txt  mycal       mypackage.zip
a2.txt  hello.txt  kayson    mydate.txt  test
2
3
4
5
6
7
8
9
10
11
案例2:将/home的文件夹压缩成myhome.tar.gz
[root@hadoop01 home]# tar -zcvf myhome.tar.gz /home/
tar: 从成员名中删除开头的“/”
/home/
/home/kayson/
/home/kayson/.bash_logout
/home/kayson/.bash_profile
/home/kayson/.bashrc
/home/test/
/home/test/.bashrc
/home/test/.bash_history
/home/test/a.txt
/home/info.txt
/home/mycal
/home/mydate.txt
/home/hello.txt
/home/mypackage.zip
/home/a1.txt
/home/a2.txt
/home/a.tar.gz
/home/myhome.tar.gz
tar: /home: 在我们读入文件时文件发生了变化
[root@hadoop01 home]# ls
a1.txt  a.tar.gz   info.txt  mycal       myhome.tar.gz  test
a2.txt  hello.txt  kayson    mydate.txt  mypackage.zip
2
3
4
5
6
7
8
9
10
11
12
13
14
15
16
17
18
19
20
21
22
23
24
案例3:将a.tar.gz解压到当前目录
[root@hadoop01 home]# ls
a.tar.gz   info.txt  mycal       myhome.tar.gz  test
hello.txt  kayson    mydate.txt  mypackage.zip
[root@hadoop01 home]# tar -zxvf a.tar.gz
a1.txt
a2.txt
[root@hadoop01 home]# ls
a1.txt  a.tar.gz   info.txt  mycal       myhome.tar.gz  test
a2.txt  hello.txt  kayson    mydate.txt  mypackage.zip
2
3
4
5
6
7
8
9
案例4:将myhome.tar.gz解压到/opt目录下
# 要解压到的目录要存在,如果不存在会报错
[root@hadoop01 home]# tar -zxvf myhome.tar.gz -C /opt/
home/
home/kayson/
home/kayson/.bash_logout
home/kayson/.bash_profile
home/kayson/.bashrc
home/test/
home/test/.bashrc
home/test/.bash_history
home/test/a.txt
home/info.txt
home/mycal
home/mydate.txt
home/hello.txt
home/mypackage.zip
home/a1.txt
home/a2.txt
home/a.tar.gz
home/myhome.tar.gz
[root@hadoop01 home]# cd /opt/
[root@hadoop01 opt]# ls
home  tmp  小说.txt
[root@hadoop01 opt]# cd home/
[root@hadoop01 home]# ls
a1.txt  a.tar.gz   info.txt  mycal       myhome.tar.gz  test
a2.txt  hello.txt  kayson    mydate.txt  mypackage.zip
[root@hadoop01 home]#
2
3
4
5
6
7
8
9
10
11
12
13
14
15
16
17
18
19
20
21
22
23
24
25
26
27
28