# Linux扩展
# 配置普通用户具有root权限
创建 aotuxx 用户,并修改 aotuxx 用户密码
useradd aotuxx
passwd aotuxx
2
配置 aotuxx 用户具有 root 权限,方便后期加 sudo 执行 root 权限的命令
vi /etc/sudoers
修改/etc/sudoers 文件,在%wheel 这行下面添加一行,如下所示:
## Allow root to run any commands anywhere
root    ALL=(ALL)       ALL

## Allows members of the 'sys' group to run networking, software,
## service management apps and more.
# %sys ALL = NETWORKING, SOFTWARE, SERVICES, STORAGE, DELEGATING, PROCESSES, LOCATE, DRIVERS

## Allows people in group wheel to run all commands
%wheel  ALL=(ALL)       ALL
## 添加以下代码
aotuxx  ALL=(ALL)       NOPASSWD:ALL
2
3
4
5
6
7
8
9
10
11
注意:aotuxx 这一行不要直接放到 root 行下面,因为所有用户都属于 wheel 组,你先配置了 aotuxx 具有免密功能,但是程序执行到%wheel 行时,该功能又被覆盖回需要密码。所以 aotuxx 要放到%wheel 这行下面。
# 配置环境变量
在/etc/profile中有一段代码:
for i in /etc/profile.d/*.sh ; do
    if [ -r "$i" ]; then
        if [ "${-#*i}" != "$-" ]; then
            . "$i"
        else
            . "$i" >/dev/null
        fi
    fi
done
2
3
4
5
6
7
8
9
该代码会遍历/etc/profile.d/目录下的 .sh 文件,取出 .sh 文件里面设置的变量并执行。所以我们可以在/etc/profile.d/目录下建立自己 .sh 文件(my_env.sh)并设置环境变量。如设置JDK环境变量:
在/etc/profile.d/目录下新新建 my_env.sh
sudo vi /etc/profile.d/my_env.sh
添加如下内容:
#JAVA_HOME
export JAVA_HOME=/opt/module/jdk1.8.0_212
export PATH=$PATH:$JAVA_HOME/bin
2
3
# 分发脚本 xsync
# scp(secure copy)安全拷贝
scp 定义
scp 可以实现服务器与服务器之间的数据拷贝。(from server1 to server2)。
基本语法
scp   -r   $pdir/$fname        $user@$host:$pdir/$fname
命令  递归  要拷贝的文件路径/名称   目的地用户@主机:目的地路径/名称
2
案例实操
# 从192.168.1.1 往 192.168.1.2 传输 /opt/module 下的jdk目录
scp -r /opt/module/jdk1.8.0_212 aotuxx@192.168.1.2:/opt/module
2
# rsync 远程同步工具
rsync 主要用于备份和镜像。具有速度快、避免复制相同内容和支持符号链接的优点。
rsync 和 scp 区别:用 rsync 做文件的复制要比 scp 的速度快,rsync 只对差异文件做更新。scp 是把所有文件都复制过去。
安装 rsync
yum install -y rsync
基本语法
rsync  -av       $pdir/$fname         $user@$host:$pdir/$fname
命令    选项参数   要拷贝的文件路径/名称   目的地用户@主机:目的地路径/名称
2
选项参数说明
| 选项 | 含义 |
|---|---|
| -a | 归档拷贝 |
| -v | 显示复制过程 |
| -r | 同步目录时要加上,类似cp时的-r选项 |
| -l | 保留软连接 |
| -L | 加上该选项后,同步软链接时会把源文件给同步 |
| -p | 保持文件的权限属性 |
| -o | 保持文件的属主 |
| -g | 保持文件的属组 |
| -D | 保持设备文件信息 |
| -t | 保持文件的时间属性 |
| –delete | 删除DEST中SRC没有的文件 |
| –exclude | 过滤指定文件,如–exclude “logs”会把文件名包含logs的文件或者目录过滤掉,不同步 |
| -P | 显示同步过程,比如速率,比-v更加详细 |
| -u | 加上该选项后,如果DEST中的文件比SRC新,则不同步 |
| -z | 传输时压缩 |
案例实操
# 从192.168.1.1 往 192.168.1.2 传输 /opt/module 下的jdk目录
rsync -av /opt/module/jdk1.8.0_212 aotuxx@192.168.1.2:/opt/module/
2
# xsync 集群分发脚本
(1)需求:循环复制文件到所有节点的相同目录下
(2)需求分析:
- rsync 命令原始拷贝
rsync -av /opt/module aotuxx@192.168.1.2:/opt/
- 期望脚本
xsync 要同步的文件名称
- 期望脚本在任何路径都能使用(脚本放在声明了全局环境变量的路径)
$ echo $PATH
/usr/local/bin:/usr/bin:/usr/local/sbin:/usr/sbin:/home/aotuxx/.local/bin:/home/aotuxx/bin:/opt/module/jdk1.8.0_212/bin
2
(3)脚本实现
在/home/aotuxx/bin 目录下创建 xsync 文件:
$ cd /home/aotuxx
$ mkdir bin
$ cd bin
$ vi xsync
2
3
4
在该文件中编写如下代码:
#!/bin/bash
#1. 判断参数个数
if [ $# -lt 1 ]
then
  echo Not Enough Arguement!
  exit;
fi

#2. 遍历集群所有机器
host1=192.168.1.2
host2=192.168.1.3
host3=192.168.1.4
for host in $host1 $host2 $host3
do
  echo ==================== $host ====================
  #3. 遍历所有目录,挨个发送
  for file in $@
  do
  #4. 判断文件是否存在
  if [ -e $file ]
  then
    #5. 获取父目录
    pdir=$(cd -P $(dirname $file); pwd)
    #6. 获取当前文件的名称
    fname=$(basename $file)
    ssh $host "mkdir -p $pdir"
    rsync -av $pdir/$fname $host:$pdir
  else
    echo $file does not exists!
  fi
 done
done
2
3
4
5
6
7
8
9
10
11
12
13
14
15
16
17
18
19
20
21
22
23
24
25
26
27
28
29
30
31
32
修改脚本 xsync 具有执行权限
chmod +x xsync
测试脚本
xsync /home/aotuxx/bin
将脚本复制到/bin 中,以便全局调用
sudo cp xsync /bin/
同步环境变量配置(root 所有者)
sudo ./bin/xsync
注意:如果用了 sudo,那么 xsync 一定要给它的路径补全。
# rsync实时推送
# 安装及基本使用
密码配置
创建文件/etc/rsync.password
内容: echo "aotuxx:1234" >>/etc/rsync.password
aotuxx:1234
修改权限
chmod 600 /etc/rsync.password
修改配置
auth users = aotuxx
secrets file = /etc/rsyncd.pwd
2
开机启动
rsync --daemon
查看远程目录
rsync --list-only 192.168.1.104::opt/
拉取数据到指定目录
rsync -avz rsync://192.168.1.104:opt/module
# 或者
rsync -avz 192.168.1.104::opt/ /root/w
2
3
使用SSH方式
rsync -avzP /usr/local/nginx/html/ root@192.168.44.105:/opt/
客户端免密
客户端只放密码:
# 将服务端rsync密码写入客户端密码文件中
echo "1234" >> /etc/rsyncd.passwd.client
# 赋权
chmod 600 /etc/rsyncd.passwd.client
2
3
4
如何实现推送?
修改配置
rsync -avz --password-file=/etc/rsyncd.passwd.client /opt/module/ rsync://sgg@192.168.44.105:/opt/module/
--delete 删除目标目录比源目录多余文件
# 实时推送
推送端安装inotify
安装依赖
yum install -y automake
下载安装inotify
# 通过wget下载
wget http://github.com/downloads/rvoicilas/inotify-tools/inotify-tools-3.14.tar.gz
# 配置检测
./configure --prefix=/usr/local/inotify
# 编译及安装
make && make install
2
3
4
5
6
监控目录
# 监控目录/opt/module/
/usr/local/inotify/bin/inotifywait -mrq --timefmt '%Y-%m-%d %H:%M:%S' --format '%T %w%f %e' -e close_write,modify,delete,create,attrib,move /opt/module/
2
简单自动化脚本
#!/bin/bash

/usr/local/inotify/bin/inotifywait -mrq --timefmt '%d/%m/%y %H:%M' --format '%T %w%f %e' -e close_write,modify,delete,create,attrib,move /opt/module/ | while read file
do
	rsync -az --delete --password-file=/etc/rsyncd.passwd.client /opt/module/ aotuxx@192.168.1.102::ftp/
done
2
3
4
5
6
inotify常用参数
| 参数 | 说明 | 含义 |
|---|---|---|
| -r | --recursive | 递归查询目录 |
| -q | --quiet | 打印很少的信息,仅仅打印监控事件信息 |
| -m | --monitor | 始终保持事件监听状态 |
| --excludei | 排除文件或目录时,不区分大小写 | |
| --timefmt | 指定事件输出格式 | |
| --format | 打印使用指定的输出类似格式字符串 | |
| -e | --event[ -e|--event ... ]access modify attrib close open move_to move create delete umount | 通过此参数可以指定要监控的事件 #文件或目录被读取#文件或目录的内容被修改#文件或目录属性被改变#文件或目录封闭,无论读/写模式#文件或目录被打开#文件或目录被移动至另外一个目录#文件或目录被移动另一个目录或从另一个目录移动至当前目录#文件或目录被创建在当前目录#文件或目录被删除#文件系统被卸载 |
注意:接收客户端`rsync`需要配置如下:
# /etc/rsyncd: configuration file for rsync daemon mode

# See rsyncd.conf man page for more options.

# configuration example:
# 需要与目录(接收)所属组一致,否则推送时报错
uid = root
gid = root
# use chroot = yes
# max connections = 4
# pid file = /var/run/rsyncd.pid
# exclude = lost+found/
# transfer logging = yes
# timeout = 900
# ignore nonreadable = yes
# dont compress   = *.gz *.tgz *.zip *.z *.Z *.rpm *.deb *.bz2

auth users = aotuxx
secrets file = /etc/rsyncd.pwd
#默认是yes,往这里推送时回报io异常
read only = no

[ftp]
    path = /opt/module
2
3
4
5
6
7
8
9
10
11
12
13
14
15
16
17
18
19
20
21
22
23
24
# SSH 无密登录配置
# 配置 ssh
(1)基本语法
ssh 另一台电脑的 IP 地址
(2)ssh 连接时出现 Host key verification failed 的解决方法
# 192.168.1.1 ssh到 192.168.1.2
ssh 192.168.1.2
2
如果出现如下内容:
Are you sure you want to continue connecting (yes/no)?
输入 yes,并回车。
(1)退回到 192.168.1.1
exit
# 无密钥配置
(1)免密登录原理
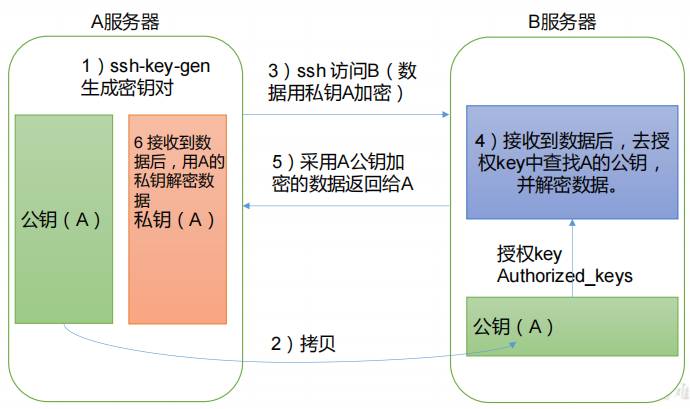
(2)生成公钥和私钥
# 当前路径/home/aotuxx/.ssh
$ pwd
/home/aotuxx/.ssh
$ ssh-keygen -t rsa
2
3
4
然后敲(三个回车),就会生成两个文件 id_rsa(私钥)、id_rsa.pub(公钥)
(3)将公钥拷贝到要免密登录的目标机器上
[aotuxx@localhost .ssh]$ ssh-copy-id 192.168.1.2
[aotuxx@localhost .ssh]$ ssh-copy-id 192.168.1.3
[aotuxx@localhost .ssh]$ ssh-copy-id 192.168.1.4
2
3
注意:
还需要在 192.168.1.2 上采用 aotuxx 账号配置一下无密登录到 192.168.1.1、192.168.1.3、192.168.1.4 服务器上。
还需要在 192.168.1.3 上采用 aotuxx 账号配置一下无密登录到 192.168.1.1、192.168.1.2、192.168.1.4 服务器上。
还需要在 192.168.1.4 上采用 aotuxx 账号配置一下无密登录到 192.168.1.1、192.168.1.2、192.168.1.3 服务器上。
# .ssh 文件夹下(~/.ssh)的文件功能解释
| 文件 | 功能解释 |
|---|---|
| known_hosts | 记录 ssh 访问过计算机的公钥(public key) |
| id_rsa | 生成的私钥 |
| id_rsa.pub | 生成的公钥 |
| authorized_keys | 存放授权过的无密登录服务器公钥 |
← 面试题