# 第三章 Vue脚手架
# 初始化脚手架
# 说明
Vue 脚手架是 Vue官方提供的标准化开发工具 (开发平台)。
最新的版本是 4 .x。
# 具体步骤
第一步 (仅第一次执行):全局安装@vue/cli。
npm install -g @vue/cli
第二步 :切换到你要创建项目的目录 ,然后使用命令创建项目
vue create xxxx
第三步 :启动项目
npm run serve
备注:
- 如出现下载缓慢请配置 npm 淘宝镜像 :
npm config set registry https://registry.npm.taobao.org- Vue 脚手架隐藏了所有webpack 相关的配置 ,若想查看具体的webpakc配置,请执行:
vue inspect > output.js关于不同版本的Vue:
- vue.js与vue.runtime.xxx.js的区别:
(1) vue.js是完整版的Vue,包含:核心功能+模板解析器。
(2) vue.runtime.xxx.js是运行版的Vue,只包含:核心功能,没有模板解析器。
- 因为vue.runtime.xxx.js没有模板解析器,所以不能使用template配置项,需要使用render函数接收到的createElement函数去指定具体内容。
# 模板项目的结构
├── node_modules
├── public
│    ├── favicon.ico: 页签图标
│    └── index.html: 主页面
├── src
│    ├── assets: 存放静态资源
│    │    └── logo.png
│    │── component: 存放组件
│    │    └── HelloWorld.vue
│    │── App.vue: 汇总所有组件
│    │── main.js: 入口文件
├── .gitignore: git 版本管制忽略的配置
├── babel.config.js: babel 的配置文件
├── package.json: 应用包配置文件
├── README.md: 应用描述文件
├── package-lock.json:包版本控制文件
2
3
4
5
6
7
8
9
10
11
12
13
14
15
16
17
# ref 与 props
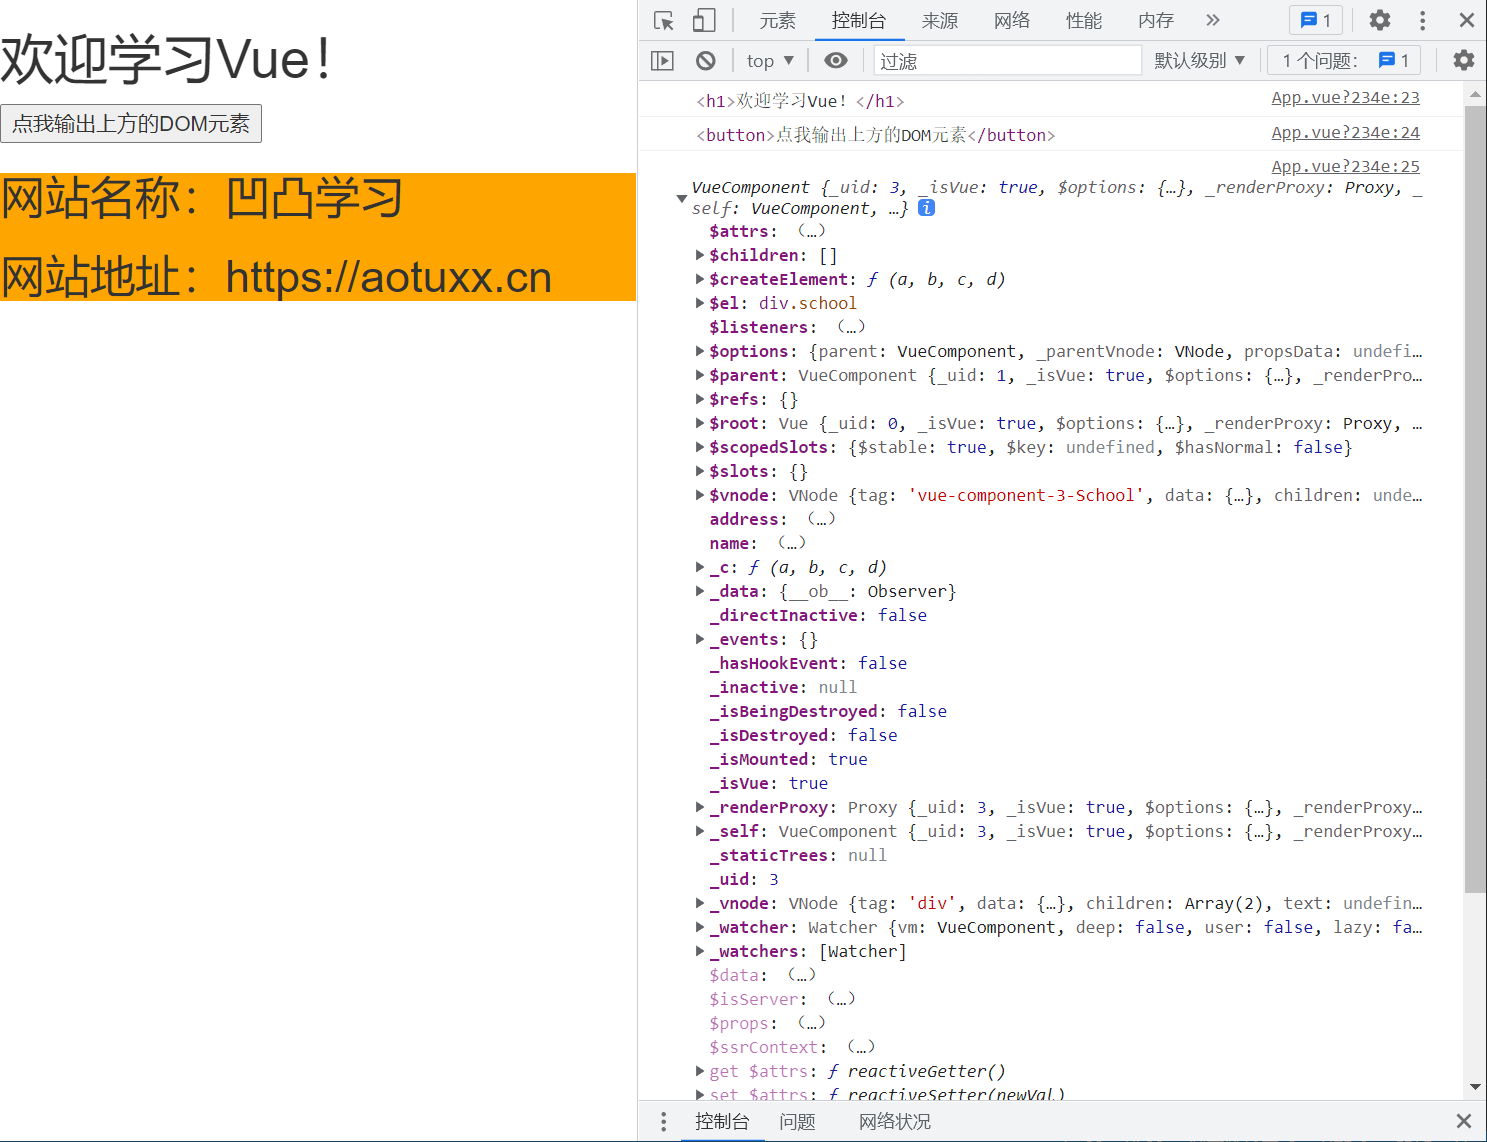
# ref属性
作用: 用于给节点打标识
读取方式:this.$refs.xxx
案例:
点击查看代码
// App.vue
<template>
	<div>
		<h1 v-text="msg" ref="title"></h1>
		<button ref="btn" @click="showDOM">点我输出上方的DOM元素</button>
		<Website ref="sch"/>
	</div>
</template>

<script>
	//引入Website组件
	import Website from './components/Website'

	export default {
		name:'App',
		components:{ Website },
		data() {
			return {
				msg:'欢迎学习Vue!'
			}
		},
		methods: {
			showDOM(){
				console.log(this.$refs.title) //真实DOM元素
				console.log(this.$refs.btn) //真实DOM元素
				console.log(this.$refs.sch) //School组件的实例对象(vc)
			}
		},
	}
</script>

// Website.vue
<template>
	<div class="website">
		<h2>网站名称:{{name}}</h2>
		<h2>网站地址:{{address}}</h2>
	</div>
</template>

<script>
	export default {
		name:'Website',
		data() {
			return {
				name:'凹凸学习',
				address:'https://aotuxx.cn'
			}
		},
	}
</script>

<style>
	.website{
		background-color: orange;
	}
</style>
2
3
4
5
6
7
8
9
10
11
12
13
14
15
16
17
18
19
20
21
22
23
24
25
26
27
28
29
30
31
32
33
34
35
36
37
38
39
40
41
42
43
44
45
46
47
48
49
50
51
52
53
54
55
56
# props配置
作用: 用于父组件给子组件传递数据
读取方式一: 只指定名称
props: ['name', 'age', 'setName']
读取方式二: 指定名称和类型
props: {
    name: String,
    age: Number,
    setNmae: Function
}
2
3
4
5
读取方式三: 指定名称、类型 、必要性、默认值
props: {
	name: {
		type: String,
		required: true,
		default: ''
	}
}
2
3
4
5
6
7
8
案例:
点击查看代码
// App.vue
<template>
	<div>
		<Blogger name="凹凸曼" sex="男" :age="18"/>
	</div>
</template>

<script>
	import Blogger from './components/Blogger'

	export default {
		name:'App',
		components:{Blogger}
	}
</script>

// Blogger.vue
<template>
	<div>
		<h1>{{msg}}</h1>
		<h2>姓名:{{name}}</h2>
		<h2>性别:{{sex}}</h2>
		<h2>年龄:{{myAge+1}}</h2>
		<button @click="updateAge">尝试修改收到的年龄</button>
	</div>
</template>

<script>
	export default {
		name:'Blogger',
		data() {
			console.log(this)
			return {
				msg:'我是凹凸学习站长',
				myAge:this.age
			}
		},
		methods: {
			updateAge(){
				this.myAge++
			}
		},
		//简单声明接收
		// props:['name','age','sex']

		//接收的同时对数据进行类型限制
		/* props:{
			name:String,
			age:Number,
			sex:String
		} */

		//接收的同时对数据:进行类型限制+默认值的指定+必要性的限制
		props:{
			name:{
				type:String, //name的类型是字符串
				required:true, //name是必要的
			},
			age:{
				type:Number,
				default:99 //默认值
			},
			sex:{
				type:String,
				required:true
			}
		}
	}
</script>
2
3
4
5
6
7
8
9
10
11
12
13
14
15
16
17
18
19
20
21
22
23
24
25
26
27
28
29
30
31
32
33
34
35
36
37
38
39
40
41
42
43
44
45
46
47
48
49
50
51
52
53
54
55
56
57
58
59
60
61
62
63
64
65
66
67
68
69
# 混入
混入 (opens new window) (mixin) 提供了一种非常灵活的方式,来分发 Vue 组件中的可复用功能。一个混入对象可以包含任意组件选项。当组件使用混入对象时,所有混入对象的选项将被“混合”进入该组件本身的选项。
例子:
export const mixin = {
	methods: {
		showName(){
			alert(this.name)
		}
	},
	mounted() {
		console.log('你好啊!')
	},
}
export const mixin2 = {
	data() {
		return {
			x:100,
			y:200
		}
	},
}
2
3
4
5
6
7
8
9
10
11
12
13
14
15
16
17
18
局部使用:
new Vue({
    mixins: [mixin],
    methods: {}
})
2
3
4
全局使用:
Vue.mixin(mixin)
Vue.mixin(mixin2)
2
请谨慎使用全局混入,因为它会影响每个单独创建的 Vue 实例 (包括第三方组件)。大多数情况下,只应当应用于自定义选项,就像上面示例一样。推荐将其作为插件发布,以避免重复应用混入。
# 插件
Vue 插件是一个包含 install 方法的对象
通过 install 方法给 Vue或 Vue实例添加方法, 定义全局指令等
例子:
plugins.js
点击查看代码
const permission = 'china'

export default {
  install(Vue, p1, p2, p3) {

    // console.log(Vue)
    console.log(p1, p2, p3)

    // 全局过滤器
    Vue.filter('mySubstr', function(value) {
      return value.slice(0, 5)
    })

    // 定义全局指令
    Vue.directive('permission', {
      // 指令与元素成功绑定时调用
      bind(el, binding) {
        // console.log('bind', binding)
        // console.log('directive中的this', this)
        const { value } = binding
        if (!value.includes(permission)) {
          el.remove()
        }
      },
      // 指令所在元素被插入页面时调用
      inserted(el, binding) {
        // console.log('inserted', binding)
        const { value } = binding
        if (!value.includes(permission)) {
          el.remove()
        }
      },
      // 指令所在的模板被重新解析时调用
      update(el, binding) {
        // console.log('update', binding)
      }
    })

    // 定义混入
    Vue.mixin({
      data() {
        return {
          cn: '我是中国人,我爱中国!'
        }
      }
    })

    //给Vue原型上添加一个方法(vm和vc就都能用了)
	Vue.prototype.say = ()=>{alert('我是中国人,我爱中国!')}
  }
}
2
3
4
5
6
7
8
9
10
11
12
13
14
15
16
17
18
19
20
21
22
23
24
25
26
27
28
29
30
31
32
33
34
35
36
37
38
39
40
41
42
43
44
45
46
47
48
49
50
51
main.js
import Vue from 'vue'
import App from './App.vue'
// 引入插件
import plugins from './plugins'

Vue.config.productionTip = false

// 使用插件
Vue.use(plugins, 1, 2, 3)

new Vue({
  render: h => h(App),
}).$mount('#app')
2
3
4
5
6
7
8
9
10
11
12
13
App.vue
点击查看代码
<template>
  <div id="app">
    <h1>{{cn | mySubstr}}</h1>
    <school name="北大" address="北京" />
    <hr>
    <student name="韦神" sex="男"></student>
    <student name="韦神" sex="男"></student>
    <button v-permission="['china']" @click="say">犯我中华者虽远必诛</button>
  </div>
</template>

<script>
import School from './components/school'
import Student from './components/student'

export default {
  name: 'App',
  components: {
    School,
    Student
  },
  mounted() {
    console.log('App...');
  },
}
</script>
2
3
4
5
6
7
8
9
10
11
12
13
14
15
16
17
18
19
20
21
22
23
24
25
26
School.vue
点击查看代码
<template>
  <div>
    <h1>学校:{{name}}</h1>
    <h1>地址:{{address}}</h1>
  </div>
</template>

<script>

export default {
  name: 'School',
  props: ['name', 'address'],
  data() {
    return {
      c: 'C'
    }
  },
  mounted() {
    console.log('School...');
  }
}
</script>
2
3
4
5
6
7
8
9
10
11
12
13
14
15
16
17
18
19
20
21
22
Student.vue
点击查看代码
<template>
  <div>
    <h1>姓名:{{name}}</h1>
    <h1>性别:{{sex}}</h1>
  </div>
</template>

<script>

export default {
  name: 'Student',
  props: ['name', 'sex'],
  data() {
    return {
      b: 'B'
    }
  },
  mounted() {
    console.log('Student...');
  }
}
</script>
2
3
4
5
6
7
8
9
10
11
12
13
14
15
16
17
18
19
20
21
22
# scoped样式
单文件组件 (opens new window)让你可以在同一个文件里完全控制 CSS,将其作为组件代码的一部分。
<style scoped>
  @media (min-width: 250px) {
    .list-container:hover {
      background: orange;
    }
  }
</style>
2
3
4
5
6
7
这个可选 scoped attribute 会自动添加一个唯一的 attribute (比如 data-v-21e5b78) 为组件内 CSS 指定作用域,编译的时候 .list-container:hover 会被编译成类似 .list-container[data-v-21e5b78]:hover。
最后,Vue 的单文件组件里的样式设置是非常灵活的。通过 vue-loader,你可以使用任意预处理器、后处理器,甚至深度集成 CSS Modules——全部都在 <style> 标签内。
# 组件化编码流程
实现静态组件 :抽取组件 ,使用组件实现静态页面效果
展示动态数据 :
a 数据的类型、名称是什么?
b 数据保存在哪个组件?
交互——从绑定事件监听开始
# 浏览器本地存储
浏览器本地存储提供两个(localStorage和sessionStorage)存储数据的对象。
共同特点:两者中的键值对总是以字符串的形式存储。
区别在于:存储在 localStorage 的数据可以长期保留;而当页面会话结束——也就是说,当页面被关闭时,存储在 sessionStorage 的数据会被清除 。
# localStorage
// 存字符串
localStorage.setItem('msg','hello,vue')
// 取数据
localStorage.getItem('msg')

// 存对象
let person = { name:'aotuman', age: 18 }
// 需要将对象转为json字符串存储
localStorage.setItem('person', JSON.stringify(person))
// 取出来的值时json字符串
const result = localStorage.getItem('person')
// 将json字符串转化为对象
const p = JSON.parse(result)
2
3
4
5
6
7
8
9
10
11
12
13
# sessionStorage
// 存字符串
sessionStorage.setItem('msg','hello,vue')
// 取数据
sessionStorage.getItem('msg')

// 存对象
let person = { name:'aotuman', age: 18 }
// 需要将对象转为json字符串存储
sessionStorage.setItem('person', JSON.stringify(person))
// 取出来的值时json字符串
const result = sessionStorage.getItem('person')
// 将json字符串转化为对象
const p = JSON.parse(result)
2
3
4
5
6
7
8
9
10
11
12
13
# Vue中的自定义事件
# 绑定事件监听
<Header @addTodo="addTodo"/>
// 或者
<Header ref="header"/>
this.$refs.header.$on('addTodo', this.addTodo)
2
3
4
5
# 触发事件
this.$emit('addTodo', todo)
# 案例
App.vue
点击查看代码
<template>
	<div class="app">
		<h1>{{msg}},学生姓名是:{{studentName}}</h1>

		<!-- 通过父组件给子组件传递函数类型的props实现:子给父传递数据 -->
		<School :getSchoolName="getSchoolName"/>

		<!-- 通过父组件给子组件绑定一个自定义事件实现:子给父传递数据(第一种写法,使用@或v-on) -->
		<!-- <Student @aotuxx="getStudentName" @demo="m1"/> -->

		<!-- 通过父组件给子组件绑定一个自定义事件实现:子给父传递数据(第二种写法,使用ref) -->
		<Student ref="student" @click.native="show"/>
	</div>
</template>

<script>
	import Student from './components/Student'
	import School from './components/School'

	export default {
		name:'App',
		components:{School,Student},
		data() {
			return {
				msg:'你好啊!',
				studentName:''
			}
		},
		methods: {
			getSchoolName(name){
				console.log('App收到了学校名:',name)
			},
			getStudentName(name,...params){
				console.log('App收到了学生名:',name,params)
				this.studentName = name
			},
			m1(){
				console.log('demo事件被触发了!')
			},
			show(){
				alert(123)
			}
		},
		mounted() {
			this.$refs.student.$on('aotuxx', this.getStudentName) //绑定自定义事件
			// this.$refs.student.$once('aotuxx',this.getStudentName) //绑定自定义事件(一次性)
		},
	}
</script>
2
3
4
5
6
7
8
9
10
11
12
13
14
15
16
17
18
19
20
21
22
23
24
25
26
27
28
29
30
31
32
33
34
35
36
37
38
39
40
41
42
43
44
45
46
47
48
49
Student.vue
点击查看代码
<template>
	<div class="student">
		<h2>学生姓名:{{name}}</h2>
		<h2>学生性别:{{sex}}</h2>
		<h2>当前求和为:{{number}}</h2>
		<button @click="add">点我number++</button>
		<button @click="sendStudentlName">把学生名给App</button>
		<button @click="unbind">解绑aotuxx事件</button>
		<button @click="death">销毁当前Student组件的实例(vc)</button>
	</div>
</template>

<script>
	export default {
		name:'Student',
		data() {
			return {
				name:'张三',
				sex:'男',
				number:0
			}
		},
		methods: {
			add(){
				console.log('add回调被调用了')
				this.number++
			},
			sendStudentlName(){
				//触发Student组件实例身上的atguigu事件
				this.$emit('aotuxx',this.name,666,888,900)
				// this.$emit('demo')
				// this.$emit('click')
			},
			unbind(){
				this.$off('aotuxx') //解绑一个自定义事件
				// this.$off(['aotuxx','demo']) //解绑多个自定义事件
				// this.$off() //解绑所有的自定义事件
			},
			death(){
				this.$destroy() //销毁了当前Student组件的实例,销毁后所有Student实例的自定义事件全都不奏效。
			}
		},
	}
</script>
2
3
4
5
6
7
8
9
10
11
12
13
14
15
16
17
18
19
20
21
22
23
24
25
26
27
28
29
30
31
32
33
34
35
36
37
38
39
40
41
42
43
44
School.vue
点击查看代码
<template>
	<div class="school">
		<h2>学校名称:{{name}}</h2>
		<h2>学校地址:{{address}}</h2>
		<button @click="sendSchoolName">把学校名给App</button>
	</div>
</template>

<script>
	export default {
		name:'School',
		props:['getSchoolName'],
		data() {
			return {
				name:'清华大学',
				address:'北京',
			}
		},
		methods: {
			sendSchoolName(){
				this.getSchoolName(this.name)
			}
		},
	}
</script>
2
3
4
5
6
7
8
9
10
11
12
13
14
15
16
17
18
19
20
21
22
23
24
25
# 全局事件总线
# 理解
- Vue 原型对象上包含事件处理的方法
(1)$on(eventName, listener): 绑定自定义事件监听
(2)$emit(eventName, data): 分发自定义事件
(3)$off(eventName): 解绑自定义事件监听
(4)$once(eventName, listener): 绑定事件监听,但只能处理一次
- 所有组件实例对象的原型对象的原型对象就是 Vue的原型对象
(1)所有组件对象都能看到 Vue原型对象上的属性和方法
(2)Vue.prototype.$bus = new Vue(),所有的组件对象都能看到$bus这个属性对象
- 全局事件总线
(1)包含事件处理相关方法的对象(只有一个)
(2)所有的组件都可以得到
# 指定事件总线对象
new Vue({
    beforeCreate () { // 尽量早的执行挂载全局事件总线对象的操作
    	Vue.prototype.$globalEventBus = this
    },
}).$mount('#root')
2
3
4
5
6
# 绑定事件
this.$globalEventBus.$on('deleteTodo', this.deleteTodo)
# 分发事件
this.$globalEventBus.$emit('deleteTodo', this.index)
# 解绑事件
this.$globalEventBus.$off('deleteTodo')
# 案例
main.js:安装全局事件总线
new Vue({
	el:'#app',
	render: h => h(App),
	beforeCreate() {
		Vue.prototype.$bus = this //安装全局事件总线
	},
})
2
3
4
5
6
7
School.vue:绑定事件
点击查看代码
<template>
	<div class="school">
		<h2>学校名称:{{name}}</h2>
		<h2>学校地址:{{address}}</h2>
	</div>
</template>

<script>
	export default {
		name:'School',
		data() {
			return {
				name:'凹凸学校',
				address:'北京',
			}
		},
		mounted() {
			// console.log('School',this)
			this.$bus.$on('hello',(data)=>{
				console.log('我是School组件,收到了数据',data)
			})
		},
		beforeDestroy() {
             // 解绑事件
			this.$bus.$off('hello')
		},
	}
</script>
2
3
4
5
6
7
8
9
10
11
12
13
14
15
16
17
18
19
20
21
22
23
24
25
26
27
28
Student.vue:分发事件
点击查看代码
<template>
	<div class="student">
		<h2>学生姓名:{{name}}</h2>
		<h2>学生性别:{{sex}}</h2>
		<button @click="sendStudentName">把学生名给School组件</button>
	</div>
</template>

<script>
	export default {
		name:'Student',
		data() {
			return {
				name:'张三',
				sex:'男',
			}
		},
		mounted() {
			// console.log('Student',this.x)
		},
		methods: {
			sendStudentName(){
				this.$bus.$emit('hello', this.name)
			}
		},
	}
</script>
2
3
4
5
6
7
8
9
10
11
12
13
14
15
16
17
18
19
20
21
22
23
24
25
26
27
# 消息订阅与发布
# 理解
这种方式的思想与全局事件总线很相似
它包含以下操作:
(1) 订阅消息——对应绑定事件监听
(2) 发布消息——分发事件
(3) 取消消息订阅——解绑事件监听
需要引入一个消息订阅与发布的第三方实现库: PubSubJS (opens new window)
# 使用PubSubJS
在线文档: https://github.com/mroderick/PubSubJS
下载:
npm install -S pubsub-js相关语法
(1)
import PubSub from 'pubsub-js'// 引入(2)
PubSub.subscribe('msgName', functon(msgName, data){ })(3)
PubSub.publish('msgName', data): 发布消息, 触发订阅的回调函数调用(4)
PubSub.unsubscribe(token): 取消消息的订阅
# 案例
消息在兄弟组件School和Student上传递。
School.vue
点击查看代码
<template>
	<div class="school">
		<h2>学校名称:{{name}}</h2>
		<h2>学校地址:{{address}}</h2>
	</div>
</template>

<script>
	import pubsub from 'pubsub-js'
	export default {
		name:'School',
		data() {
			return {
				name:'凹凸学校',
				address:'北京',
			}
		},
		mounted() {
			// console.log('School',this)
			/* this.$bus.$on('hello',(data)=>{
				console.log('我是School组件,收到了数据',data)
			}) */
			this.pubId = pubsub.subscribe('hello', (msgName, data) => {
				console.log(this)
				// console.log('有人发布了hello消息,hello消息的回调执行了',msgName,data)
			})
		},
		beforeDestroy() {
			// this.$bus.$off('hello')
			pubsub.unsubscribe(this.pubId)
		},
	}
</script>
2
3
4
5
6
7
8
9
10
11
12
13
14
15
16
17
18
19
20
21
22
23
24
25
26
27
28
29
30
31
32
33
Student.vue
点击查看代码
<template>
	<div class="student">
		<h2>学生姓名:{{name}}</h2>
		<h2>学生性别:{{sex}}</h2>
		<button @click="sendStudentName">把学生名给School组件</button>
	</div>
</template>

<script>
	import pubsub from 'pubsub-js'
	export default {
		name:'Student',
		data() {
			return {
				name:'张三',
				sex:'男',
			}
		},
		mounted() {
			// console.log('Student',this.x)
		},
		methods: {
			sendStudentName(){
				// this.$bus.$emit('hello',this.name)
				pubsub.publish('hello', 666)
			}
		},
	}
</script>
2
3
4
5
6
7
8
9
10
11
12
13
14
15
16
17
18
19
20
21
22
23
24
25
26
27
28
29
# 过度与动画
# vue动画的理解
操作 css 的 trasition 或 animation
vue 会给目标元素添加/移除特定的 class
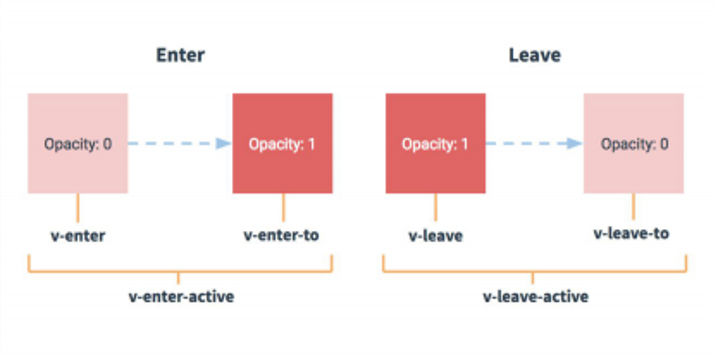
过渡的相关类名 :
(1)
xxx-enter-active: 指定显示的 transition(2)
xxx-leave-active: 指定隐藏的 transition(3)
xxx-enter/xxx-leave-to: 指定隐藏时的样式
# 基本过渡动画的编码
在目标元素外包裹
<transition name="xxx">定义 class 样式
a) 指定过渡样式: transition
b) 指定隐藏时的样式: opacity/其它
# 案例:
App.vue
点击查看代码
<template>
	<div>
		<Test/>
		<Test2/>
		<Test3/>
	</div>
</template>

<script>
	import Test from './components/Test'
	import Test2 from './components/Test2'
	import Test3 from './components/Test3'

	export default {
		name:'App',
		components:{Test,Test2,Test3},
	}
</script>
2
3
4
5
6
7
8
9
10
11
12
13
14
15
16
17
18
19
Test.vue
点击查看代码
<template>
	<div>
		<button @click="isShow = !isShow">显示/隐藏</button>
		<transition name="hello" appear>
			<h1 v-show="isShow">你好啊!</h1>
		</transition>
	</div>
</template>

<script>
	export default {
		name:'Test',
		data() {
			return {
				isShow:true
			}
		},
	}
</script>

<style scoped>
	h1{
		background-color: orange;
	}

	.hello-enter-active{
		animation: atguigu 0.5s linear;
	}

	.hello-leave-active{
		animation: atguigu 0.5s linear reverse;
	}

	@keyframes atguigu {
		from{
			transform: translateX(-100%);
		}
		to{
			transform: translateX(0px);
		}
	}
</style>
2
3
4
5
6
7
8
9
10
11
12
13
14
15
16
17
18
19
20
21
22
23
24
25
26
27
28
29
30
31
32
33
34
35
36
37
38
39
40
41
42
Test2.vue
点击查看代码
<template>
	<div>
		<button @click="isShow = !isShow">显示/隐藏</button>
		<transition-group name="hello" appear>
			<h1 v-show="!isShow" key="1">欢迎您!</h1>
			<h1 v-show="isShow" key="2">凹凸学习</h1>
		</transition-group>
	</div>
</template>

<script>
	export default {
		name:'Test',
		data() {
			return {
				isShow:true
			}
		},
	}
</script>

<style scoped>
	h1{
		background-color: orange;
	}
	/* 进入的起点、离开的终点 */
	.hello-enter,.hello-leave-to{
		transform: translateX(-100%);
	}
	.hello-enter-active,.hello-leave-active{
		transition: 0.5s linear;
	}
	/* 进入的终点、离开的起点 */
	.hello-enter-to,.hello-leave{
		transform: translateX(0);
	}

</style>
2
3
4
5
6
7
8
9
10
11
12
13
14
15
16
17
18
19
20
21
22
23
24
25
26
27
28
29
30
31
32
33
34
35
36
37
38
Test3.vue
点击查看代码
<template>
	<div>
		<button @click="isShow = !isShow">显示/隐藏</button>
		<transition-group
			appear
			name="animate__animated animate__bounce"
			enter-active-class="animate__swing"
			leave-active-class="animate__backOutUp"
		>
			<h1 v-show="!isShow" key="1">个人学习网站</h1>
			<h1 v-show="isShow" key="2">凹凸学习 [https://aotuxx.cn]</h1>
		</transition-group>
	</div>
</template>

<script>
	import 'animate.css'
	export default {
		name:'Test',
		data() {
			return {
				isShow:true
			}
		},
	}
</script>

<style scoped>
	h1{
		background-color: orange;
	}

</style>
2
3
4
5
6
7
8
9
10
11
12
13
14
15
16
17
18
19
20
21
22
23
24
25
26
27
28
29
30
31
32
33